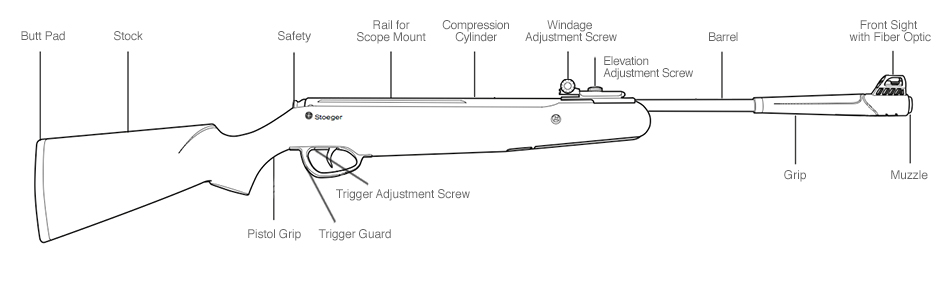
How Airguns Work
The airgun has an automatic locking safety that engages automatically when the gun is cocked. The safety slide is located at the end of the compression tube. (See diagram.)
Back = Safe
When the safety button is fully rearward and the white dot is visible, the safety is in the on or safe position.
Forward = Fire
When the safety button is pushed fully forward and the white dot is not visible, the safety is in the off or fire position.

The trigger pull on all Stoeger Airguns models is adjusted in the factory. For most shooters, the trigger does not need an adjustment. The adjustment feature is for experienced shooters.
This 2-stage trigger has an adjusting screw for second-stage length adjustment. (See diagram.)
To reduce second-stage length, turn the screw clockwise. To increase second-stage length, turn the screw counterclockwise.

Stoeger X-Series airguns are single-shot, break-barrel, spring-piston rifles. They require cocking only once. The muzzle break acts as a lever and as a handle for cocking.
You cock the gun by pulling down on the end of the barrel in a single action. This compresses a powerful spring and piston inside the gun, drawing air into its compression chamber.
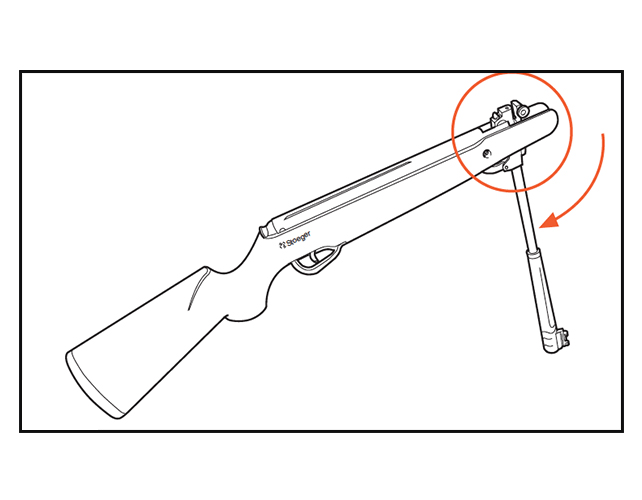
To cock the airgun, point the airgun in a safe direction while keeping your finger off the trigger. (See diagram.)

With one hand, grasp the stock at the pistol grip. Holding the rifle firmly, tap the barrel behind the front sight in order to break locked position. (See diagram.)

Grasp the barrel behind the front sight and pull downward until it stops. You will hear an audible click of the trigger mechanism lock when the pressure is released. You must control and not release the barrel under strong resistance until an audible click is heard.
Be careful to avoid pinching your hand or fingers in the hinge area. (See diagram.)
Use a cleaning rod to ensure no pellets are lodged in the barrel and that the rifle is completely empty.
Check the pellet to ensure it matches the caliber of the airgun.
Insert only one pellet into the breech face. (See diagram.) Pellets should be placed in the air rifle in only one direction, with the skirt of the pellet toward the butt of the gun.
Never try to insert multiple pellets, as that can be dangerous and cause rifle malfunctions.

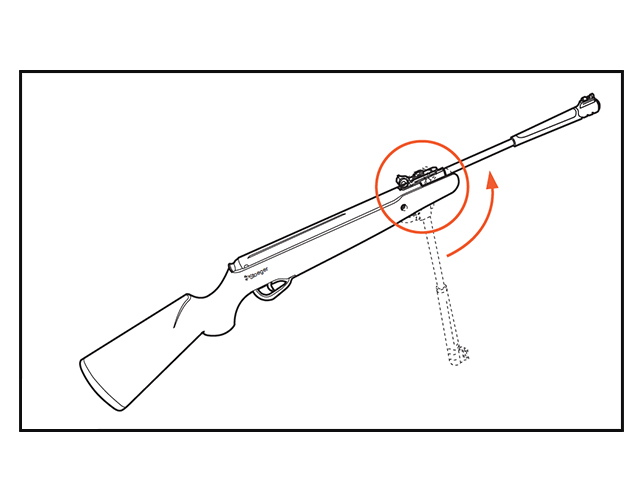
After loading a pellet in the breech end of the open barrel, swing the barrel easily back to its original, locked position. Be careful to avoid pinching your hand or fingers in the hinge area. (See diagram.)
This is firing position. The safety is automatically set at this time.
Now the airgun is ready to aim and shoot. Visit the airgun shooting tips page for how-to information.
Why Chronographed Airgun Speed Varies
If you use a chronograph to check the speed of your rifle, you may notice the results can vary by more than 10%. Here’s why. Many conditions affect the velocity: pellet weight, design, barrel condition, ambient temperature, elevation, and others.
How Far Pellets Travel
Pellets fired from a Stoeger air rifle can travel as far as 500 yards.
Dieseling: Why New Airguns Smoke and are Loud
All new spring-piston air rifles smoke and are loud at first. It’s called dieseling. The lubricant used in manufacturing is exploding under compression when the airgun is fired. This will stop with use, maybe in as many as 200 shots. Then the air rifle will shoot more quietly, accurately, and consistently.